| Home Documentation Installation | 2011/01/02 |
|
This is the outdated phpwcms project site.
phpwcms InstallationSomething new is coming soon. Always keep in mind to check GitHub for the newest release. How to install phpwcms on Windows and Linux  phpwcms does not have an installer like many other applications. But the install process is very easy. Before you start be sure you have installed ImageMagick and GhostScript. You need some experience in how to copy files via file transfer protocol (FTP) to your web server. And you must have ready your MySQL account information (db name, db host, username, password). Let's start! phpwcms does not have an installer like many other applications. But the install process is very easy. Before you start be sure you have installed ImageMagick and GhostScript. You need some experience in how to copy files via file transfer protocol (FTP) to your web server. And you must have ready your MySQL account information (db name, db host, username, password). Let's start!Download phpwcms The current version of phpwcms can be find on the project web site under Download. Download ever the complete version of phpwcms not the patch package. Choose the compressed archive you like: on Windows take ZIP compressed archive, on Linux and Mac OS X it is better to download the GZ compressed archive. Use a webbrowser for downloading the install package on to your harddisk. If you have shell access on Linux or Mac OS X you can use "wget" for direct download to the web server.
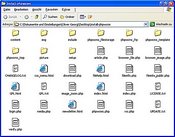
After download uncompress the archive to a new directory. Be cautious to save all included path information. If you do not have installed an uncompression software on Windows try PowerArchiver. The content should look like the screenshot. Now open a FTP connection to your web space. You have to think about where to put phpwcms online. You can put phpwcms in any folder on your webspace or put it directly into the web sever root. Copy the complete uncompressed structure via FTP to your web server. When this is done you have to check access rights for special files and folders. 1) DIR phpwcms_tmp/thumb_list 777 2) DIR phpwcms_tmp/thumb_preview 777 3) DIR phpwcms_ftp 777 4) DIR phpwcms_filestorage/1...10 777 5) DIR content/images 777 6) FILE setup/setup.conf.inc.php 666 6) FILE include/inc_conf/conf.indexpage.inc.php 666 7) FILE phpwcms_template/inc_css/frontend.css 666 8) FILE phpwcms_template/inc_default/startup.html 666 All other files listed above can set to 644, directories to 755. Sometimes it can help to set mode to 766 for the following directories: phpwcms_tmp, phpwcms_template, phpwcms_ftptakeover, inc_css, content. If you have further access problems try to set all files and directories to 777 (not recommend). Start semi-automatic setup process After you have successful copied phpwcms installation files to your webserver start the first time semi-automatic setup process by using the following link:  http://www.mydomain.com/path_2_phpwcms/setup/index.php http://www.mydomain.com/path_2_phpwcms/setup/index.phpOn top of the setup index page is an info field that gives information to the system, server software, PHP version and the path in which phpwcms is installed. If you have a PHP version <4.2.1 you should not continue recommend PHP version >4.3.0. To continue you have to agree the GPL licence then click button to go to step 1 of phpwcms setup script. Info: Inside the setup folder is a file "setup.conf.inc.php". All setup value will be stored there. You can also edit this file manually. Look for "phpwcms_init.sql" to setup required db tables manually. Step 1: MySQL database infos Insert your MySQL database infos like the host (default: localhost) or IP address of the MySQL server, your MySQL username/password and db name. Attention! The setup process can create the phpwcms tables only and NOT the MySQL table itself. If you want to separate phpwcms database tables from other tables inside your database you can define a table prefix. This is not really neccessary because phpwcms table names ever start with "phpwcms_". The prefix makes a table named like "myprefix" + "_" + "phpwcms_". If your MySQL server supports persistent database connection let the correspinding mark checked this speeds up the db queries. Large providers may disallow this feature. In this case uncheck mark "use persistent db con". If you install phpwcms for the first time and want to let the setup process create all db tables mark "create all db tables" checked. Then click "send db data". If everything is OK let's go on Step 2: create site infos and admin account In normal case you do not have to fill in difficult things here. Insert the base URL ONLY in field site name. Complete the base URL with an ending slash "/". Attention! Do not add any additional path info like
mydomain.com/phpwcms/". This will be defined later. Fill in the login information for admin user and admin email address. phpwcms comes without any predefined user login information. You have define yourself. Do not forget to check "ceate admin account" if setup script should create the given account for you. Step 3: phpwcms path values There is not so many to say about here. Read any field info attentively. You can rename default directories to whatever you want. Attention! Do not add any starting or ending slash "/" to phpwcms path values. To use a directory outside phpwcms root use path names like this: "../dir_outside". There is a additional directory not listed here. It is "picture". This is the base dir for the {IMAGE.. } replacement tag. It can not be renamed at the moment. So be sure it exists inside the phpwcms root directory. Step 4: phpwcms content values The most important values are "content width" and "preview image". The content width value is important for rendering image lists. It adjusts the image width. That ensures that your content is rendered very well. The preview image value defines maximum width and height of preview images. Remember that preview images will displayed if an image is click zoomable. If this is to large your site visitor may have problems. This often results in big image file sizes too. Step 5: Ready to start phpwcms? Step 5 is to verify defined path values. Check that possibly every directory has OK. Maybe you can ignore RED alerts if you have set access rights as described above. I will test this. If you are unsure set every listed directories to usermode 777. You will get error messages very fast if there is a problem ;-) Download the finished configuration file and put this into "include/inc_conf". If neccessary rename the config file to "conf.inc.php". Security info If you have successfully adjusted phpwcms delete the setup folder. Make a backup of your current "conf.inc.php" file. It is possible to edit this file manually. Possible problems - IIS Sometimes the $_SERVER["DOCUMENT_ROOT"] var is not available in PHP under Microsoft Internet Information Server. If so you have to insert the root value manually in the conf.inc.php. Do it like this: $_SERVER["DOCUMENT_ROOT"] = '/home/where_my_web_root_is';
| ||
  | ||
| Copyright © 2002-2008 Oliver Georgi · XML RSS · GitHub · SourceForge.net · Google Code | ||